Hello!
On this post We’re gonna explain How to do Plasma Beams like the ones on this post:
http://kemonogames.com/2016/05/30/nom-nom-nom-delicious-plasma-beams/
If you followed the Plasma Beams development on our blog, you should remember the theory here:
http://kemonogames.com/2016/05/31/uheartbeast-replied-to-your-video-nom-nom-nom/
This post explains better that theory using Godot Engine, but you could apply this to all video game engines.
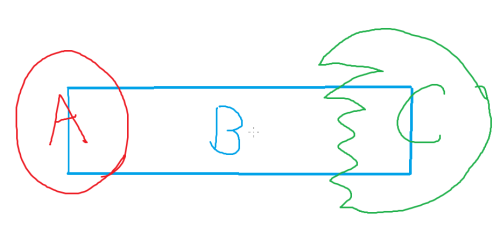
First a Plasma Beam is composed by three parts
A: The Start: AnimatedSprite or Sprite.
B: The Body: Sprite, we play with the scale of this sprite and texture coordinates.
C: The End: AnimatedSprite.
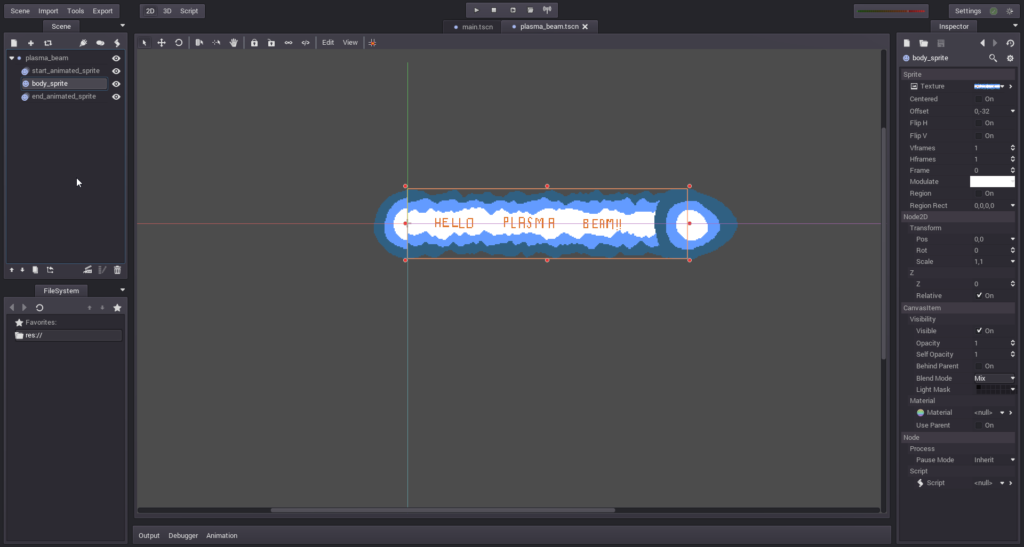
The most important part is the Body, for achieve a nice scrolling effect we need to loop the texture of this Sprite on X axis and should be horizontally tileable too. Most game engines exposes with shaders something called UV which are the texture coordinates on a 3D plane, but at least with Godot we could achieve the same effect with Region Rect property of Sprites.
So here are the steps for the implementation in Godot using the least amount of GDScript code I can think of:
1. Create some images to start, body and end of the Plasma Beam, remember the body should be tileable on his sides:
6. To change the size of the body, you modify the Region Rect width accordingly, NOT the scale. Now there is a catch, in our Region Rect animation, we animated the four properties of the rect (x,y,width,height), each frame the Region Rect is set to a value, including the width, so we can’t use the Animation Player directly to animate the X property of the Region Rect.
An example of what is happening with Region Rect in the animation:
Frame 1: 0,0,256,64
Frame 2: 6,0,256,64
Frame 9: 54,0,256,64
If we try to change the width (256) property of the Region Rect to increase the Plasma Beam size, the animation player reverts it to 256.
To fix this we must expose a float variable in GDScript to programmatically update the X property of the Region Rect on every animation frame. For our implementation we will use a float range between 0.0 and 1.0 so we could multiply it with the texture width.
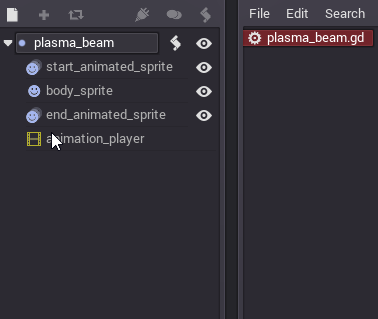
So we added a new GDScript to plasma_beam called plasma_beam.gd:
With this code:
extends Node2D
#Body Sprite
var _body = null
var _body_width
export(float,0.0,1.0,0.01) var region_rect_x =
0.0 setget _set_region_rect_x

func _ready():
	_body = get_node("body_sprite")
	_body_width = _body.get_texture().get_width()

func _set_region_rect_x(value):
	region_rect_x = value
	_update_body_region_rect_x()

func _update_body_region_rect_x():
	if(_body != null):
		var rect = _body.get_region_rect()
		rect.pos.x = -region_rect_x_value * _body_width
		_body.set_region_rect(rect)
The important part of this code is “region_rect_x”, this variable is exposed to editor with the word “export” which accepts values from 0.0 to 1.0 on 0.01 increments. With the setget keyword we tell Godot to call the “_set_region_rect_x” method each time the “region_rect_x” variable is changed. Here we can update the Region Rect’s X property.
Now on the plasma_beam node in editor there should be a new property called Region Rect X, the only thing left is modify the animation player to update this property between 0.0 and 1.0 and we can finally change the Region Rect’s width with the animation playing.
7. Update the end sprite position to reflect the body width changes. For this we will use the same “region_rect_x” principle.
Lets add a new exposed float variable to our plasma_beam.gd called “beam_size_x” that will call the “_set_beam_size_x” method when changed, here we will update the Region Rect’s width and the end sprite position/rotation. We should also handle the root node rotation, for that we will listen to “NOTIFICATION_TRANSFORM_CHANGED” notification and update the end sprite rotation accordingly.
The updated code should be:
extends Node2D

#Body Sprite
var _body = null
#End Sprite
var _end = null
var _body_width
export(float,0.0,1.0,0.01) var region_rect_x =
0.0 setget _set_region_rect_x
export(float,0.0,5000.0,0.1) var beam_size_x =
256.0 setget _set_beam_size_x

func _ready():
	_body = get_node("body_sprite")
	_end = get_node("end_animated_sprite")
	_body_width = _body.get_texture().get_width()

func _notification(what):
	if(what == NOTIFICATION_TRANSFORM_CHANGED):
		_update_end_position()

func _set_region_rect_x(value):
	region_rect_x = value
	_update_body_region_rect_x()

func _set_beam_size_x(value):
	beam_size_x = value
	_update_body_width()
	_update_end_position()

func _update_body_region_rect_x():
	if(_body != null):
		var rect = _body.get_region_rect()
		rect.pos.x = -region_rect_x * _body_width
		_body.set_region_rect(rect)

func _update_body_width():
	if(_body != null):
		var rect = _body.get_region_rect()
		rect.size.width = beam_size_x
		_body.set_region_rect(rect)

func _update_end_position():
	if(_body != null && _end != null):
		var pos = _body.get_pos()
		pos.x += beam_size_x
		pos.rotated(self.get_rot())
		_end.set_pos(pos)
8. Change Blend Mode on all Sprites to “Add” and your Plasma Beam is done.
Here is a Demo Project made in Godot Engine implementing all the steps in this post:


